Jan 21, 2013

Living Room Reveal

I'll be honest. I love to decorate, but when it comes to living rooms, I'm totally stumped.

Maybe it's because our furniture doesn't really "go" together. We're in the stage of life when you either use whatever you can find for free or at Goodwill.

Or maybe it's because our living room doesn't have any empty walls. It's surrounded by windows, doors, and entries, which makes any furniture arrangement slightly awkward.

Even though I don't really have any idea if this is how I want the living room to be, I thought I'd go ahead and share what it looks like today after a little bit of a makeover.

Other than the window treatments, it wasn't bad at all when we moved in.  This is the view from the dining room.

Before:

After:


I warmed up the room with a coat of paint in Encompass by True Value and made curtains out of drop cloths.

Why would I use drop cloths? Well, we have really high ceilings, and to buy enough fabric to make curtains would have cost a fortune. I bought one 15 x 12 foot drop cloth and had enough fabric to make four panels.


I trimmed the long edges with some white fabric to give them a more tailored look.


This is our Goodwill rocking chair.  It is extremely comfy.


I love our basket of cozy blankets.  The wool plaid blankets came from... you guessed it!  Goodwill.


I really am going to hang things on the walls. Someday. Maybe. They're plaster, and it's nearly impossible to get a finishing nail into that stuff.

The wingback chair was my first slipcover project.  More on that another day...


I still have my Christmas plaid pillows out... I'm pretending that the red in them works for Valentine's Day.


Our biggest obstacle was figuring out how to arrange the furniture so that everyone could visit and still be able to see the television. This is an old house, and we don't have many electrical outlets. We started by putting the t.v. in its place.  By putting the couch at an angle, we were able to make a "square" with the other two chairs.


The door to the left side leads to the office, and to the right is the entryway to the dining room.


This is the view from the front door.


That end table is getting a makeover soon (hopefully).  It's one of my favorite Goodwill finds: solid wood, Ashley brand, tags still on (you can see them dangling underneath, actually...), $15. We're going to refinish it to match the darker wood of our other furniture.


There you have it!  I wouldn't say our living room is wildly spectacular, but it's cozy. There is something nice about a "collected" look as opposed to an I-just-ran-to-Target-and-bought-their-entire-home-section look.

Jan 18, 2013

Master Bedroom Reveal

I am so excited to bring you our master bedroom reveal!  I've heard of so many people who remodel their entire houses and leave their bedroom until the end.  It was definitely a thought in our minds, as nobody else will really see our bedroom.  And then I heard a design philosophy that changed my mind.  In effect, it said that the things closest to you should be the nicest, so buy nice napkins and cheap curtains.

I'm sure I totally butchered it, but you get the point.

After finishing up the rooms we needed to use for our Christmas open house (which are also the rooms where we spend the majority of our time), I decided to tackle the master bedroom.

This is what we had to start with:


This is the view from the doorway. The two doors on either side of the window wall lead to our walk-in closets. The trim and the walls below the wallpaper border were painted peach, and the walls above the border were lime green. Here is a closer look at the border:


I'm sure it looked really great way back when the work was done, but it definitely wasn't our style. This master needed a makeover.

You know how you see "budget-friendly" makeovers that involve saving up a few thousand dollars, calling in contractors, and tearing out walls?

Well, this isn't that kind of makeover. If that's what you're looking for, you will be sorely disappointed.

Ours was truly a budget-friendly makeover. I used a wet sponge to loosen up the wallpaper, ripped it off, and painted over the walls with paint we had leftover from the dining room. I painted the trim with leftover paint from the kitchen cabinets. The curtain rod was originally mounted on the window casing, and we moved it so it would sit above the window (if you don't understand why, check this out). The end.

It sounds a lot easier (and quicker!) than it actually was. But it was SO worth the effort!

{drumroll, please...}


Aaaaaaahhhhh, so light and refreshing! The wall color is Carriage Ride by True Value.


We have an attic bedroom, so it stays pretty warm. We decided to ditch the quilt and just keep a throw at the end of the bed for chilly nights.


I found Ralph Lauren sheets on a huge discount at TJ Maxx that match the color and design of the throw perfectly. I love TJ!


The walls are covered with paneling, and behind the paneling is plaster.  I'm pretending that the paneling is beadboard.

Marshall found the pieces to an old table, and he used the ends to make a sign. He designed and assembled the whole thing, and then I painted one of our favorite verses on it.


This is how the sign started out:


I also repainted a dresser to use in our bedroom. It is one that we fixed up last year. And by fixing up, I mean Marshall cleaned all of the dead mice out of it, bleached the whole thing, removed the warped veneer, etc. This picture was taken after it was cleaned up and sanded:


And this is after we painted it:


It worked with the colors in that house, but it didn't really match the gray in our new bedroom. We decided to paint the dresser white, and we switched out the hardware for some vintage glass knobs we had on hand.


We had to leave our bedroom tv behind. When we pick it up, it'll sit on top of the dresser. For now, I put up some wedding pictures, our "What a Difference" print, my wedding bouquet, and our wedding cake topper.


Before:

After:


That's it!  Thanks for stopping by and taking the tour!

If you like what you see on our blog, we'd love for you to subscribe!


HookingupwithHoH

Jan 16, 2013

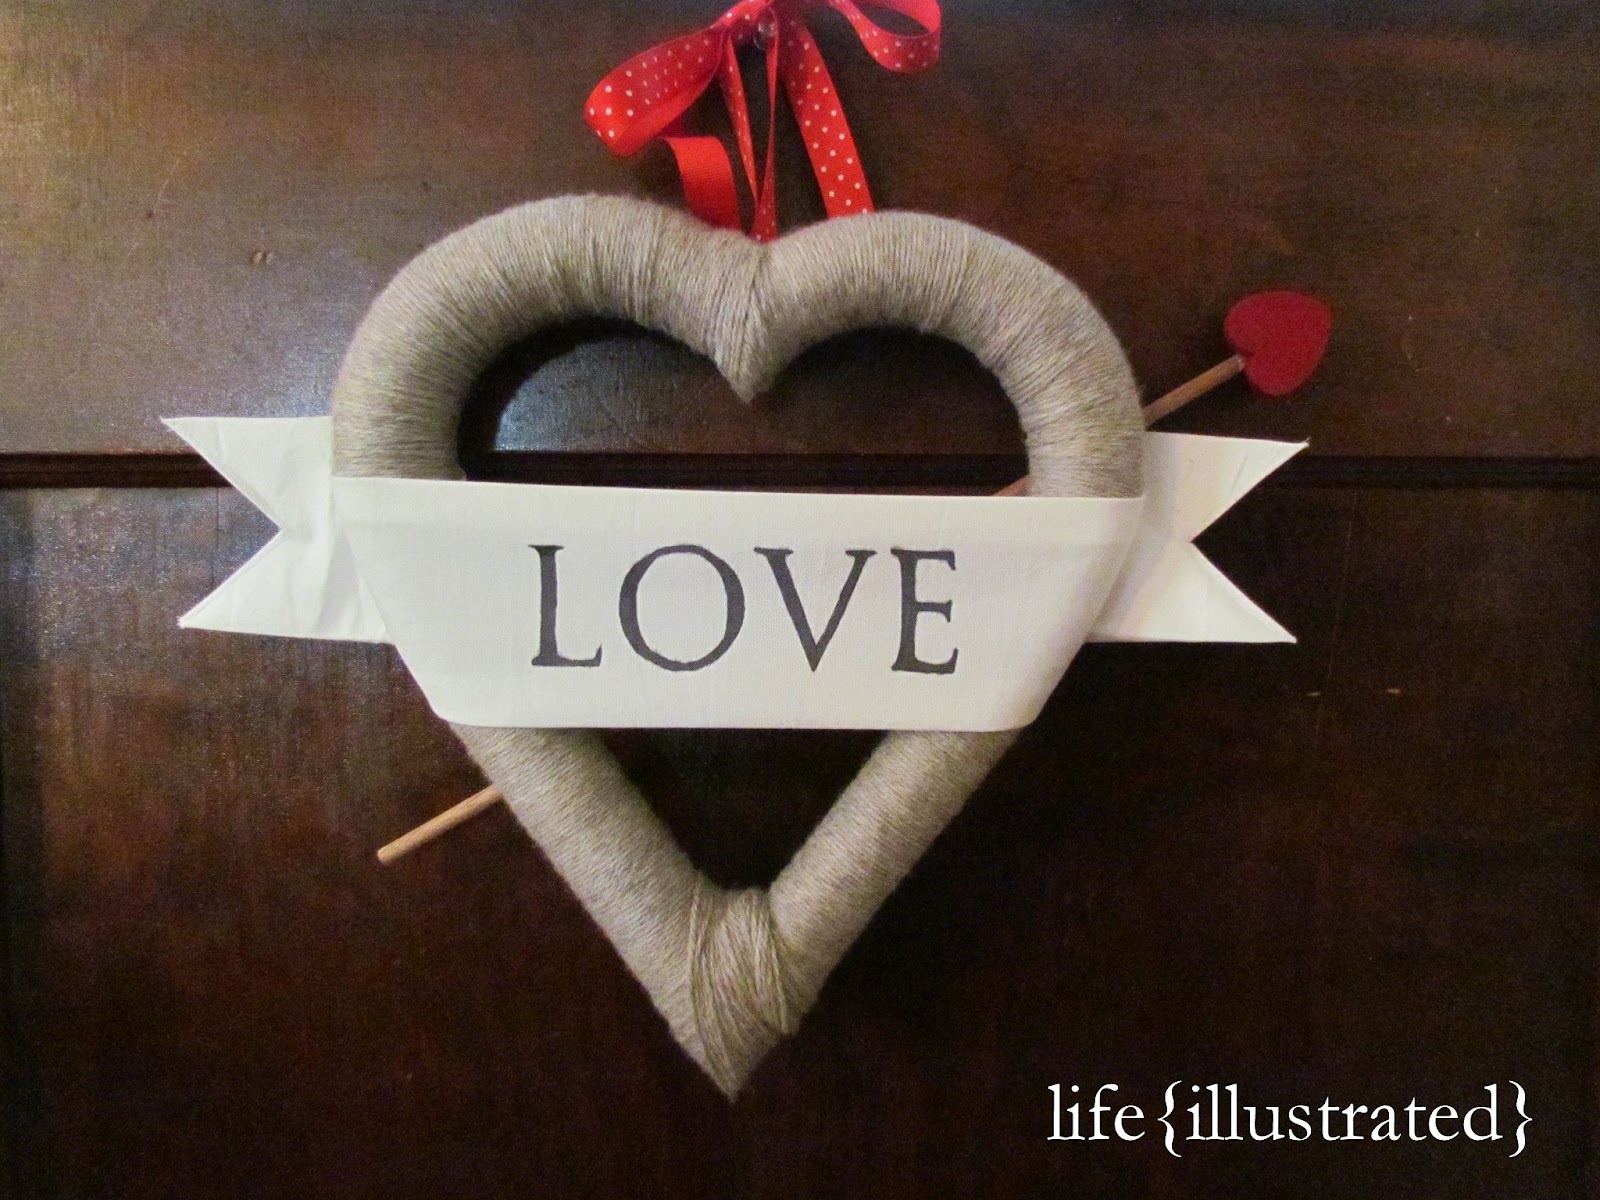
Valentine Wreath

In my last post, I showed you the first thing people will see when they come in the door.  Today, I thought I'd share with you what people will see when they walk up to the front door.


It makes me smile every time I see it!  It's not quite as easy as the the other Valentine wreath I shared with you, so pop in a movie, grab your glue gun, and get comfy.

You will need:
1 heart-shaped wreath form (mine was stiff styrofoam)
yarn in whatever color you prefer
white felt or fabric
1/4 inch dowel rod
craft wooden heart
red or pink acrylic paint
ribbon for hanging
glue gun and glue sticks


Begin by tying the end of the yarn to the wreath.  I just used a simple knot.


Wrap the yarn tightly all the way around the wreath form.  It does get tricky at the top and bottom of the heart.  Just keep overlapping the yarn until everything is covered.  When finished, run some glue over the back of the wreath to keep the yarn from shifting.


Paint the wooden heart red or pink.  It will be the tip of the arrow.  When dry, glue the heart to the end of the dowel rod.

Decided how long you'd like your arrow to be, and cut it to size.  Glue the arrow to the back of the wreath so it looks as though it is piercing the heart.

There are a few different ways to make the banner.  If you are using felt, you can simply cut the banner to size.  Print the word "love" out, center the felt over the letters, and trace them with a permanent marker.

I decided to use some muslin scraps I already had, so I cut the fabric and allowed enough room to fold over and sew the edges.  I traced the letters onto the banner as described above.  I had to use some cardstock to stiffen the pointed ends of the banner, but it worked out in the end.  Felt probably would've been easier.

Once you've finished the banner, glue it to the wreath.  Add a ribbon for hanging.


I cannot take any credit for the design of the wreath.  It's one I found on pinterest, and the blog has been removed from the internet.  You can still find the original directions from a guest post at Tatertots and Jello.

HookingupwithHoH


Jan 15, 2013

Valentine Vignette

I've had so much fun sharing my Valentine's Day projects with you over the past week!  I hope you've been inspired to get crafty and make some for your own home.

Today, I have one last printable for you.  It's a very simple phrase but one that means so, so much.


This completes my Valentine vignette for the dresser in the entryway.  The paper hearts were some that I had  leftover from last year.  I cut hearts out of old book pages and then glued smaller scrapbook paper hearts on top.


You can find the how-to for the pitcher of love {here}.


The heart-shaped printable from 1 Corinthians 13 is {here}, and you'll find the burlap and button heart tutorial {here}.


I absolutely love that this is the first thing that people will see when they walk in the door!


And if you want to know what the first thing is that people will see when they come to the front door.... come back Thursday!

As always, if you like what you see, we'd love for you to subscribe.  It's easy and free!


HookingupwithHoH