Showing posts with label Autumn Decor. Show all posts

Sep 27, 2012

Driftwood Pennant Banner

I've discovered something about myself recently.  I have a tendency to start a project, start and finish a second (third, fourth, fifth...) project before the first one is finished, and then come back to the first project months later.  For example, I starting making a quilt in January, and it still isn't finished.  However, I have started and finished several other quilts and numerous other sewing projects.  Why is that?  Boredom, maybe.  You can only sit and hand-quilt for so many hours in a row.  Someday, I will finish my quilt.  I just know it.

Well, today, I finished a project.  At the beginning of summer, I mentioned to my husband that I wanted to make a pennant banner.  I was envisioning something weathered, beachy, and summery.  He promptly went down to the beach, picked out a cool piece of driftwood, cut it into triangular pieces, and drilled holes in all the pieces for hanging.  And the pieces sat for months.  He ended up storing them away for "someday."  That someday was today.

I posted pictures of a little vignette on one of our dressers the other day, and as soon as I took the pictures, I knew I wanted to hang a banner over the mirror.  After some searching, Marshall found the driftwood pieces, and I pulled out my cheap, acrylic paint.


I chose "autumn," but I'm thinking about making a "thanksgiving" one... for Thanksgiving.  Sometimes, I am incredibly original.


Marshall sanded across the letters very lightly with 220 grit, and I strung some twine through the pieces and hung the banner on the mirror.  So easy!


{free printable art, burlap & acorn bouquet tutorial, DIY  framed magnetic chalkboard}

It would also look great on a fireplace.  Ours is fake, so I usually try to draw the eye upward and away from the peeling faux brick.  There is only so much you can do when you don't own your home...

{fabric flower monogram, burlap & button autumn art, free printable}

You get the idea, though, right?


It was so simple to make, but I love how it spiced up the mirror a bit!  Sometimes, it's the little things...

Fall Party

Sep 25, 2012

Autumn Mantel & Vignette

I don't know about you, but I am loving the "It's Fall Y'all" link party!  I hope you've had a chance to look at some of the wonderful ideas for Autumn decorating.  Today's theme is mantels and vignettes, so without further adieu, our mantel:

Fabric Flower Monogram Tutorial

Burlap & Button Autumn Art Tutorial

Printable Art
And here is another favorite spot in the house that I spiffed up for Autumn:


Printable Art
Burlap & Acorn Bouquet

Click here for the It's Fall Y'all: Fall Mantels link party!


Sep 18, 2012

Autumn Tablescape

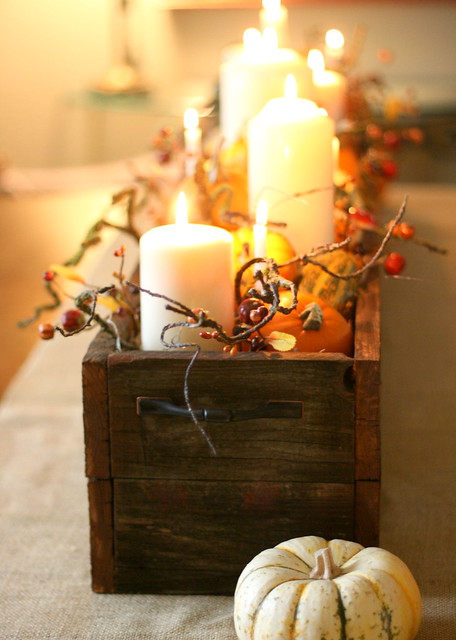
I've been looking forward to today's post as this centerpiece is probably my favorite thing in our home right now.  Marshall came home with a couple of old, beaten up drawers a couple of months ago thinking that I could use them somehow.  I knew they had potential but wasn't sure what to do with them.  And then I saw this:
Centerpiece
{via}
I have tons of candles left over from our wedding and an autumn garland that never looked right anywhere.  Put them together with some artificial leaves, pine cones, and corn and...


Click here for my DIY Burlap Table Runner post.


The Lettered Cottage

Sep 17, 2012

Burlap Table Runner and a Treat for YOU!

For a while there, I was really into place mats.  I still like the look of them, but they just don't get very clean.  It also seems kind of silly to buy enough place mats to fill the table up when there are only two of us eating at it.  Enter: the table runner.  It's proven to be a much better option for us, and I love the look of it.  For Autumn, I thought I'd try my hand at a burlap runner and thought I'd share it with you, too.  This is another easy project that shouldn't take more than an hour or two.


You will need:

-several yards of burlap (depending on the length of your table)

-3/4 yard off-white fabric (I chose one with a linen look)


Start by measuring the length of your table and determining how large you'd like for your runner to be.  When you have decided on the dimensions, lay the burlap out flat on the floor and note where you need to cut.  Slowly and carefully pull one thread all the way out to make your cutting line clear.  This will help you to cut it in a straight line.


I ended up pulling out about 5 strands on both of the lengthwise edges so that both sides would have a frayed look.


Cut down the middle of the space.


Cut two 42 x 12 inch strips from your white fabric.  Fold over one long edge and both short edges 1/4 inch, press, and repeat with opposite sides.


With right sides together, pin the long, unhemmed side of one of your white pieces to the bottom, short edge of your runner.  The easiest way I found to do this was to pin the edges first and then make pleats from the outer edges to the middle.


My pleats were 2 inches wide and over lapped by one inch.  This created four pleats on each side of the runner.


Sew the pieces together with 1/4 inch seam allowance.  Press the pleats down, and sew 1/4 inch seam along the top edge.  Repeat with the other edge.


Want a more sophisticated runner?  No problem!  Fold the long edges of the runner over a 1/2 inch, press, fold another 1/2 inch, and press again.  Stitch along the hem with a 3/8 inch seam.  Shorten the ruffle to your desired length.


And for your treat...  The Ben Franklin in Chariton, IA has graciously agreed to give a 20% discount on burlap purchases of 1/2 yard or more to life {illustrated} readers (in store only)!   The discount will run 09.17-09.25.2012.  Hurry in to get your burlap!

Past Burlap Posts:


Linking up at:
Skip To My Lou

Sep 13, 2012

Burlap and Acorn Bouquet


More burlap... Are you shocked?  I came up with the idea for these flowers as I worked on the flowers for my burlap wreath.  I thought an acorn would make a cool center for the flowers, so I hot glued an acorn into the loop of my flower twist (for the how-to on fabric rolled flower making, click here).


I used sticks from the backyard for my flower stems.


I think they look really cute in a vase with some leaves and berries.

I also printed our initial on card stock, cut it out, and framed it against some burlap to tie the whole theme together.  Love it!


If you like what you see, we'd love for you to subscribe to our blog!  For those of you who follow via Facebook, please consider subscribing; we'd like to phase out the posting of our blog posts as our status updates.  Subscribing is free and easy, and each new post will go straight to your inbox.  Simply enter your e-mail address in the "Follow by E-mail" box at the top right corner of this page.  Then go to your e-mail and confirm your subscription.  It's that easy!


Sep 12, 2012

Autumn Burlap Wreath Two Ways

I don't know about you, but I have had autumn on the brain!  I love all of the seasons, but I'm a firm believer that variety is the spice of life.  I'm ready for a change!  It's not far off, and after a hot, dry summer, it will be a welcome sight.

I've also been loving burlap.  It is cheap, easy to work with, and versatile.  Marshall attended an auction this summer and bought me 12 burlap feed bags for $1.  I am such a blessed girl!  If you don't happen to have 12 burlap bags lying around the house, you can find some burlap here.


You will need:
1 wire wreath form
burlap- 1/2 yd should cover a 12 inch frame, depending on how much you "scrunch"
orange and red artificial flowers OR fabric rolled flowers

Begin by cutting your burlap into 4 inch wide strips.

Weave your strip over and under the wire rungs, as shown.
Push each row of burlap up, and weave the strip back across the form.  Be sure to tuck all the ends in.
Your finished wreath should look like this.
Cut your artificial flowers off an inch below the petals.  
Hot glue them to the burlap in a cluster.

I made a second wreath with fabric rolled flowers and loved how it turned out, too.  If you've never made a fabric rolled flower before, it's very easy.  You can use any length of fabric; longer makes a fatter flower, and shorter makes a smaller one.  I usually keep the width between 1 and 2 inches.


Holding one end with one hand, twist the other end as tightly as possible, making sure the right side of the fabric is on the "outside" of the twist.


Allow the twist to double over and twist around itself.


Beginning with the folded or looped end, hot glue the twist around.  Glue the ends on the back side of the flower.


Make several of these flowers in a variety of colors and sizes.  Arrange them on your wreath, and hot glue them in place.


I'm linking up to It's Fall Ya'll: Outdoor Decor.